Showing posts with label Recipes. Show all posts

Sunday, April 6, 2014

Avocado in your smoothie

Have you tried using avocado as a substitute for oil or eggs or bananas in recipes?  I thought it was kind of weird in thought. I mean, avocado?? It's green and used in guacamole. Who puts it in a drink?


Well I do now!   I love it in smoothies. It adds a whole level of creaminess that not even bananas can create. This is my new favorite smoothie combination. 

Chocolate Protein Raspberry - Strawberry - Blueberry Green Smoothie

1 cup plain Greek yogurt
1/2 ripe avocado
2 spinach ice cubes or 1 cup fresh spinach and 1 cup ice
1 cup almond milk or 1 chopped up apple
1 cup frozen berries (raspberry - strawberry - blueberry any combination)
1 scoop chocolate protein

I put the frozen ingredients at the bottom and pour the milk over the top and blend until smooth. 

If it is too thick, add a little more liquid. If it's not cold enough or thick enough, add more ice. 

It is amazing!  It has the consistency of frozen yogurt and makes for a delicious breakfast - snack - dessert.  And it is ridiculously filling. It makes about 16 oz of smoothie and works perfectly for two servings. 

To share or freeze for later :)

Oh and if you haven't made spinach ice cubes yet, you should definitely do it!  I buy a big bag of fresh spinach when it's on sale and dump the whole thing in my Vitamix and add just about a cup of water so I can blend the spinach until it's completely liquid. Then I pour the liquid into my ice cube trays and freeze them. Once frozen, I pop them out of the trays and put them in a ziploc bag and save them to throw a couple in a smoothie every day. Easiest way to make a tasty green smoothie and add some vitamins! 

Saturday, April 5, 2014

GF peanut butter chocolate chip pecan cookies


Flour free, sugar free peanut butter chocolate chip pecan cookies 

2 cups peanut butter
2/3 cup honey
2 eggs
2 tablespoons vanilla
2 tsp baking soda
2/3 cup chocolate chips
2/3 cup pecans 

Preheat oven to 350 degrees. 

Mix together PB, honey, vanilla until completely combined. Whip in your eggs in a separate bowl and then fold into the PB mixture. Lightly mix in the baking soda and then add in the chocolate chips and pecans. 

Scoop out tablespoon size balls and roll between your hands firmly to pack it together. Bake at 350 degrees for 10-12 minutes. Let cool completely before eating or else they might crumble. 

Makes about 16.

Monday, January 20, 2014

Homemade Granola in bulk

I hate boxed cereal. Hate it. And I don't use that word lightly. I hate all the additives. I hate the price. I hate that my kids are totally addicted to it.  I hate the convenience of buying it off the shelf. I hate that we go through a box in a couple days.

Sunday, I decided I would try something new.  I like making big batches muffins for breakfast options on school days. I like making big batches of pancakes that Gabe can microwave one or two in the mornings.  And now, I have made a big batch of granola for a cereal replacement.

I like that I already had all the ingredients at my house and that the quantities are all so big that the kids could help me pour and mix. We actually made it in a brown paper bag so the kids could shake it together. What I really love about granola is how customizable it is. The original recipe (from The Homemade Pantry by: Alana Chernila - best family style cookbook ever) called for sesame sticks (replaced with peanuts), flaked coconut (used raisins) and almond extract (omitted) but ours is still delicious!

Even if you only make a half batch, you will still have a good amount. So try it and see what you think!

Homemade Granola (makes 16 cups)

10 cups (2 pounds) old-fashioned oats
3/4 cup peanuts (or other tree nut)
1/2 cup sunflower seeds
2 cups sliced or chopped raw almonds
1 cup raisins
1/2 tsp. salt
1 1/2 tbsp. cinnamon
3/4 cup canola oil (or whatever oil you want to use)
1/2 cup maple syrup
1/2 cup honey
1 1/2 tbsp vanilla extract

Preheat oven to 200 degrees.

Combine the oats, peanuts, sunflower seeds, almonds, raisins, salt and cinnamon in your largest bowl or we threw everything in a brown paper bag and shook everything until it was mixed.  In a separate bowl, mix together the liquid ingredients until they are a uniform consistency.  Pour the liquid over the dry mixture and stir together until evenly coated.

Line four cookie sheets with parchment paper.  Spread the granola evenly on each pan.  Put them in the oven and set your timer for 20 minutes.  After each 20 minutes, stir the granola around on each pan to ensure it doesn't burn, and reset the timer for another 20 minutes.  Do this once more before the granola is done.  You end up baking the granola for a total of 60 minutes.

Take it out of the oven and let it cool completely before you put it in a bag or plastic container.  It is good in a ziploc or sealed container for 3 weeks and can be frozen for up to 6 months.

Mmmm good!

Thursday, December 19, 2013

Christmas Cookie and Candy gifts (the best kind)

I love making food for gifts.  There is something so awesome in working really hard to make something delicious for another person to enjoy.  Tie in the Christmas season with my love of baking and giving food and you get this amazing cookbook that I bought last year for super cheap.

Click to buy it here!

I can't remember how much I bought it for (around $10) and it has been worth every penny.  I LOVE that it provides recipes for classic cookies (like sugar and peanut butter), and that it also has fancier cookies.  But mostly I love that each recipe is designed to feed a crowd.  I like to make big batches of cookies and with this cookbook I don't have to multiple the recipes, it is already done for me!

I knew that I wanted to send Matt a box of cookies and wanted to have enough left over to share with the neighbors (while leaving us some to each at home) and so I settled on two cookie recipes - the drop sugar cookie recipe and peanut butter kiss cookies.
GF drop sugar cookies
I loved the easiness of the drop sugar cookies compared to the roll out frosting kind.  Those are all well and good, but I usually make gingerbread cookies to roll out and decorate.  This time I was making cookies in a rush, so the drop part worked out much better.  All I changed to make this recipe GF was my Namaste Foods all purpose flour and 1/2 teaspoon xanthan gum per cup of flour.  They turned out super delicious, lighter than a regular sugar cookie but still retain the buttery sugary goodness.

GF Drop Sugar Cookies (recipe originally from The Great Christmas Cookie Swap book)
makes approx. 126 cookies

6 cups GF all purpose flour
3 tsp xanthan gum
3 tsp baking powder
3/4 tsp salt
2 1/2 cups butter (4 1/2 sticks) softened (not melted)
3 cups sugar
3 eggs
9 tbsp milk
6 tbsp vanilla

Preheat oven to 350 degrees.  Whisk flour, xanthan gum, baking powder and salt until blended and set aside.  In a large mixing bowl, beat butter and sugar until creamy.  Add eggs, milk and vanilla; beat until well blended.  Add in flour mixture until just blended.

Measure out dough in tablespoons and drop them on the greased cookie sheet about 2 inches apart.  I actually ended up rolling them into balls in my hands and pressed them flat on the sheet.  They don't spread as much as I though, so you don't have to worry about them getting too close together and making one giant misshapen cookie.  I sprinkled colored sugar on them and put them in the oven to bake for 14 minutes.  Remove them when they turn golden brown and set them aside to cool.

I was surprised that the dough didn't soften up too much with all the butter, so you shouldn't have to refrigerate them before baking.


GF Peanut Butter Kiss cookies
I LOVE peanut butter.  A little too much.  Not everyone loves it just plain and simple like me, so I decided to make the peanut butter kiss (get it, a chocolate Hershey's kiss) cookies.  Again, to alter this recipe and make it GF I changed out the flours and added 1/2 tsp of xanthan gum to it.

GF Peanut Butter Kiss cookies (original recipe from my step-mom)
I doubled this recipe and made about 40 cookies

1 1/4 cup GF
1 tsp xanthan gum
1/2 tsp baking powder
3/4 tsp baking soda
1/4 tsp salt
1/2 cup shortening (I used butter)
1/2 cup peanut butter (creamy works best, even though I prefer crunchy)
1/2 cup white sugar
1/2 cup brown sugar
1 egg
1 bag Hershey kisses

Preheat your oven to 375 degrees.  Whisk together the flour, xanthan gum, baking soda and powder and salt to make the dry mixture and set aside.  Cream together your butter/shortening with sugars.  Add in the egg and peanut butter until blended.  Slowly blend the dry mixture into the wet until fully incorporated.  

Refrigerate for 20 minutes to regain firmness of dough.

(I forgot this step originally and they turned out fine - the cookies just spread a little more because of the temperature of the butter.  If you forget or are on a time crunch, no worries.  Go ahead and make the cookies.)

Get out a plate or bowl and pour some white sugar or decorative sugar to roll the cookies in.  Also start unwrapping the kisses so you are ready to press them in the middle of the cookie when you pull them out of the oven.

Measure out one tablespoon of dough and roll it into a ball between your hands.  Roll the dough in the sugar until it is completely covered.  Fill up your pan and bake for 10-12 minutes.  Once the cookies are browned, remove them from the pan and press the Hershey's kiss in the middle of the cookie and let it cool.


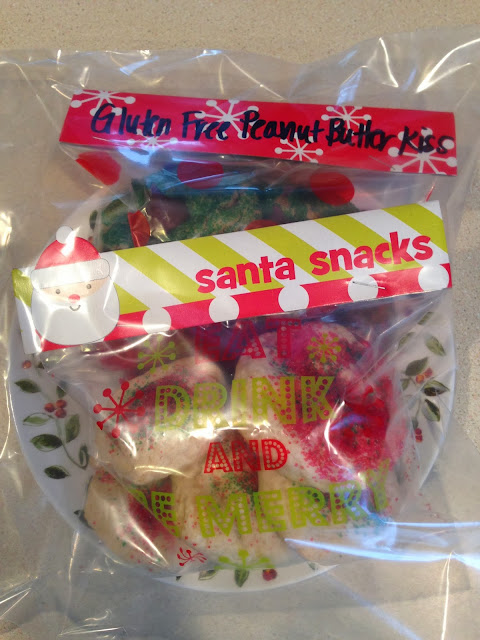
I found these cute decorative ziploc bags in the Dollar Spot at Target and they came with cardboard to staple over the zipper part (dresses it up a little).  I included a couple of each kind on a small plate my Grandma had given me (to start a cookie exchange) and put them all in a larger ziploc bag.  We made four of these and enjoyed passing them out to our neighbors!

I didn't forget about Matt and set aside about two dozen of the sugar cookies and a dozen and a half of the peanut butter kisses for him.  I wanted to add more to fill his box up as much as possible.  Also, I am always nervous about sending something as perishable as cookies, especially now with the chaotic process that is the US postal system during Christmas.  I had a couple 'pins' set aside that I wanted to try out, so I decided Matt would be my guinea pig (love you babe).  

Cinnamon Sugar Nuts
I originally saw this post from Eat Good 4 Life (Cinnamon Sugared Walnuts) and decided to go for it.  I have never really candied anything but I have burned sugar trying to make caramel a couple times, so I was a little hesitant.  I had almonds, walnuts and cashews on hand and measured out two pounds to make a double batch.

Over all the recipe was very easy.  I was extremely nervous about burning the sugar while trying to bring it up to the soft ball temperature (235 degrees) so I had it on lower heat than I probably should have.  Also, my candy thermometer's battery died (awesome timing) so I used my meat thermometer and it worked just fine.  It did eventually reach that temperature and I added the vanilla and nuts as soon as it did.  I couldn't get the mixture to spread out enough for me to break into individual nuts (like she has pictured), so mine is in chunks kind of like brittle.

Let me just tell you that it is amazing.  It reminds me a lot of the booths at malls and amusement parks that sell the candied almonds in the pastry bags.  I will definitely make it again and I am excited about giving it as gifts or bringing it as a dessert to pass.  

I also got these little boxes at Target's Dollar Spot.  I can't handle the cuteness!

Lastly, I made chocolate covered pretzels to add in there.  I have a surplus of pretzels and chocolate chips, so I figured why not.


I will not even try to say that these works of art are mine - I forgot to take a picture.  If you are looking at making something fast and easy, these are the way to go!  I hand dipped half of each pretzel into milk chocolate and then dipped the chocolate part into sprinkles to set the chocolate.  I love how versatile they can be.  You can use any shape of pretzel, any kind of chocolate and any extra topping you want.  

Dark chocolate covered pretzels in candy cane chunks.
Milk chocolate covered pretzels with sea salt.
Semi sweet chocolate covered pretzels with nuts.

I love the possibilities.  I love that it seems fancy and in all reality - it's just a pretzel.

Kind of like these gifts.  

They are just cookies and candies, but they are dressed up as gifts of goodwill and community.  

If you are looking for more Holiday candy ideas, as well as ideas for how to dress up packaging them, check out my Pinterest page!  


Tuesday, November 19, 2013

Gluten Free Stuffing (my favorite part of the Thanksgiving meal)

Whenever I am making a new recipe for a big event (birthday or holiday), I always give it a test run.

My biggest fear is that I make the recipe and it turns out awfully and everyone looks at me with mixed emotions of terror, disgust and anger.  "How dare she serve us this!"  "Oh my, she thought this was edible?"  "What was she thinking?"

Sorry.  I get a little carried away.  But really, I do test out a new recipe.

I was inspired by this Gluten-Free Sage Dressing recipe by Adventures of a Gluten-Free Mom.  I picked this one because I LOVE sage.  And because it looked easy.  And I am all about easy.

 I followed all the same steps that GF Mom listed, but I changed up my ingredients a little.

Here is my recipe:

Genna's GF Stuffing

2 loaves of GF bread (either store bought GF bread like Udi's or homemade GF bread)
2 1/2 cups diced celery (ended up being a full pack of celery hearts for me)
1 1/2 cups diced onions (about 2 medium)
1/2 cup butter (1 stick)
4-6 cups broth (I will get to this at the end).
2 tbsp poultry seasonings
2 bay leaves
salt and pepper (to taste)

Because I chose to make the bread from scratch, I had to start there.  After it was done, I cubed up the bread in as fine of pieces as I could and then ripped it a little smaller.  Each piece ended up being around 1/2 inch by 1/2 inch.   I spread these pieces between two large jelly roll pans and dried these at 250 degrees for about 45 minutes.  After I took these out I turned the heat up to 350 degrees to warm up.  Then I diced up the veggies.  I like them in small pieces, so I cut each piece of celery in half before dicing it up.  After cutting them up I put the full stick of butter in the pan and turned the heat on to medium.  When the butter was completely melted, I added the 2 tablespoons of poultry seasoning and salt and pepper and turned off the heat.  I dumped the bread chunks into the baking dish and then put the butter and veggie mixture in and spread everything through.  When I felt it was thoroughly mixed, I added the chicken broth.  This part was the trickiest.  After I added three cups, I let the stuffing sit for about five minutes and gave it a chance to soak in.  I stirred it up and noticed that all the broth had been absorbed so I added another cup of broth and put it in the oven to bake.  I could have easily added another cup of broth or two as the stuffing was good, but sections of it was a little dry.  It really is just up to you, depending on if you want more crispy stuffing or not.  Then I baked the stuffing for 30 minutes covered, stirred it (checked the moistness - you could add more broth here if you felt it was getting dry) and cooked it for another 10 minutes uncovered.

When I took it out, I was in heaven.  Stuffing is my absolute favorite part of Thanksgiving and I couldn't even wait for it to cool before I tried it.

It was amazing.  It was heaven.  It tastes just as great as it looks. 

Trust me, try this recipe.  I can't wait to make this again on Thanksgiving day.
 Follow my blog with Bloglovin

Tuesday, November 12, 2013

My stab at ice cream cake

For every birthday I make the birthday person what ever they want for a dessert. Gabe has had a cookie cake. Matt has asked for a pumpkin pie (surprised? You shouldn't be). But my sister was the first to ever ask for an ice cream cake. I had thought over the logistics of it, but had never tried to execute it before. Recently, I had pinned this Hot Fudge Sundae post by Smitten Kitchen and I turned to this recipe for guidance.


You can really make this cake two ways:
Ice cream, fudgy cookie layer, ice cream (like Smitten kitchen)

Smitten Kitchen - Hot Fudge Sundae Cake
Or cake, fudgy cookie layer, ice cream (which is what I did).


Either way would be divine as long as you pick compatible flavors.
My sister chose chocolate cake and peanut butter cup ice cream.
So I started making the cake the day before I needed it to ensure I had enjoy cooling time for the cake and refreezing time for the ice cream layer. I would advise starting around 18-24 hrs prior to the end time for your cake.

Step One - Cake Layer

Even though I didn't really want to, I ended up shelling out the big bucks ($4) for a gluten-free devil's food cake mix for the cake part. I wanted to make it from scratch but I was on a limited time frame and my kitchen had been torn apart from the window replacement surgery happening on our house.
The one thing that i would change about the cake over all is the ratio, you really want an even or slightly higher ice cream to cake ratio. That might just be me, but we ended up with a higher cake to ice cream ratio and found it lacking a little. When you go to bake your cake portion, make sure to only fill your cake pan (or pans or cupcake pans) 1/4 of the way full. Trust me. I know it doesn't sound like a lot and it will cause you to have remaining batter, but you really want to make sure that after the cake rises there is enough room to add the ice cream. Bake the cake layer for a little less time because it is less thick. When the knife, fork, toothpick, whatever goes out clean - let the cake cool completely and start smashing Oreos with a rolling pin.

Step Two - Fudgy Cookie Layer

SmittenKitchen has an amazing hot fudge syrup recipe on this link to add her homemade chocolate smashed up cookies. I used homemade hot fudge sauce I already had in the fridge and you can definitely use the ice cream hot fudge sauce you get in a jar from the store. Just watch out for the High Fructose Corn Syrup, it's a killer. But seriously. Then I took about half of the bag of Oreo's (not GF - you caught me) and they got ziploc'd and smashed to smitherin's. Smittenkitchen recommends using a food processor to get them properly crushed and pulverized but i found a rolling pin was much more theraputic. Mix about a half cup of hot fudge and about 3/4 cup of Oreo crumbs together. You want the consistency to still be kind of like frosting so that it will spread nicely on top of your cake and not rip off the top layer. Then once the cake is cool, spread the fudgy cookie mixture on top making sure to spread it thin enough that it makes a thin line between the two layers and doesn't become a layer itself. Unless you want it that way. It could be good like that. I ended up with some fudgy cookie mixture left over (which will go great on vanilla ice cream later) so don't feel like you have to use it all. Then put in the freezer for about an hour so the hot fudge will set.

Step Three - Ice Cream Layer

This is really the only tricky part of the whole cake because you want the ice cream to sit out on your counter for long enough to make it spreadable, but not too liquidy that it will spill all over the cake. Freezing the hot fudge layer makes it a protectant against the ice cream so the cake doesn't get soggy, but the ice cream can spill down around the sides of the cake so be careful not to let it get too melty before applying it.
I found that using the back of a large soup spoon worked the best to spread the ice cream. I also kept a bowl of warm water next to the cake and would dip my spoon in it to keep it from sticking and it spread a lot better that way.
I tried to stack my ice cream layer as high as the pan and as flat as possible. If you can't get it even or as high as you want, don't fret. Getting it done quickly so it can refreeze is much more important otherwise it will all melt and get harder to work with. Once this layer if frozen, you can try to go back and add more if you want.

Step Four - Decorations

To decorate my sister's cake, I just whipped up some heavy cream and piped it in circles around the edge, topped off the circles with Reese's pieces. We put a candle in it right before it was time to sing. You can decorate it however you want. Use whipped cream as a frosting or pipe frosting letters on there.

Step Five - Eating

It was delicious. I do recommend letting it thaw a little before trying to cut it or eat it as the cake hardens a little more than the ice cream. But I was amazed at how good it was! It will definitely be on the rotation for birthday cake ideas!


Follow my blog with Bloglovin

Tuesday, October 29, 2013

"Ninnie (Minnie) Mousie" birthday party and links

When I first ask Calla what kind of birthday party she wanted, "Ninnie Mousie" was what came out. 

"Ninnie Mousie birthday party!  Ninnie Mousie!!"  

And for the last month. 

"Ninnie Mousie!!  Ninnie Mousie party, Mom!"  
"I know Calla, you are having a Minnie Mouse birthday party."  
"Ninnie Mousie!"

Ever since we went to Disney World this summer, Calla has been obsessed with Minnie Mouse and Cinderella.  I decided on a Minnie Mouse party because I thought it fit her age group the best.  And it works perfectly that she can wear her costume to her birthday party (the upside of a Halloween birthday, I guess).  So once the theme was decided, I began scouring the internet for party and decoration ideas.  My birthday parties are always planned in advance and thoroughly thought through.  

This is what ended up coming together.


Many might say that I am cliche or overdoing it, but I don't care.  I always have a banner or pennant saying "Happy Birthday" somewhere in the house and hang streamers from the ceiling.  I ALWAYS do this.  For EVERY birthday party.  Because... birthdays are special.  And even though the streamers fall down numerous times during the day, it is worth it to see my kids so excited.  I want them to know how much of a celebration it is that they were born.  How much fun and happiness they bring to my life.  So I go over the top decorating and planning.  And I will... for as long as I am able.

We are a sucker for balloons at birthday parties.  Everyone gets a ton of balloons.  And even though they are kind of a waste (the helium is dead by that night), they totally set the mood for the birthday party and provide fantastic entertainment.  I have seen old kids (7 and up) and young ones (1 and up) all enjoy the bouncy fun of a balloon.  I was so excited to see these polka dot ones (here).  They fit perfectly into the Minnie Mouse theme.

In keeping with the Minnie Mouse theme, I immediately set out how to decorate a cake for Minnie Mouse.  Every year, the birthday kid gets their own personal cake.  It is a 6 inch pan I bought while we were living in South Korea (you can buy one here) and works perfectly with cake mixes from boxes (you end up with 18 cupcakes instead of 24).  This is another thing that I do specially every year.  Something my kids count on every year, knowing that they get a whole cake to themselves.  They can eat as much or as little of it as they want (it is their party after all) and it can be decorated how ever they want.  It might sound strange or like extra work, but when it is party time - they love it so I love it.

I found another blog that used Double Stuff Oreos and mini Oreos to get the Mickey Mouse effect, so I used that example along with edible pearls to decorate the tops of the cupcakes and Calla's personal cake.

I wanted to have another treat option - in case there weren't enough cupcakes or as a back up plan in case the cupcakes didn't turn out exactly how I wanted - so I bought a Mickey Mouse cookie cutter (can buy this here) and dyed the marshmallows different shades of pink for effect.

Another food choice was trail mix.  My kids LOVE trail mix.  Any thing with nuts and raisins and they go crazy.  I found half of this mix from Target (Peanut Butter and Jelly Trail mix) and added shredded coconut, almonds, peanuts and raisins to bulk it up a little bit.  I liked that it had the pink and purple yogurt covered raisins.

Over all the party was a huge success.  Calla had a great time seeing all her family on all sides and loved being the center of attention (as long as Mom was in sight).  She loved dressing up in her Minnie Mouse costume and had a riot playing with her new Princesses and castle.  However, Calla's favorite present was the chap stick my Grandma got her.  Never fails.  

Zander is also a big fan of Calla's new toys.  Pink is just a color, right?


There are a lot of amazing ideas online for Minnie Mouse birthday parties.  I pulled some ideas from these blogs, but there were a lot of ideas that I didn't a chance to do.  Check 'em out!

No Link

Sugar Fresh Designs - Free Minnie Mouse Banner
Peonies and Poppyseeds - Minnie Mouse Birthday Printables
No Link
LoveThisPic - Minnie Mouse Party Pictures
FunPicBoard
This is the recipe I used for Calla's Red Velvet cake and cupcakes.  I ended up tripling the recipe as it says it makes 10 cupcakes.  Also, I used Namaste Gluten Free All Purpose Flour instead of the King Arthur brand, 1 tablespoon of red food coloring and added 1/2 cup of oil to the batter to add moisture.  It had rave reviews and turned out delicious.  I will warn you that it is much more dense than a standard cake mix cake and is more the consistency of a pound cake - but still very good.

Cupcake Project - GF Red Velvet Cupcakes
Follow my blog with Bloglovin

Monday, September 30, 2013

Making Pumpkin Puree (again)

I am getting ready to cut open a couple pie pumpkins this afternoon and had to re-read my own post from last year.  This post was originally on my "Real Life of a Military Wife" blog, but since I have switched to this new one, I figured I should transfer this post too!

So, if you are getting ready to make some pumpkin puree - enjoy this quick and easy tutorial!  And enjoy how super cute my "littles" used to be!  It's hard to believe how little they were a year ago!

-------------------------------------------------------------------------------------------------------------------------------------------

I have been reading all kinds of books about eating healthy, natural unprocessed foods - how to make and store food instead of buying it.  I will make a post with links to the books I have been reading, so thankful for the library and internet resources to educate me!  Anyway, one of the things Matt loves most is pumpkin pie.  Instead of a cake this year, he wanted a pumpkin pie for his birthday.  So instead of buying the canned pumpkin pie puree or mix, I decided this was the year I would make it from scratch.


When I was looking up ways to cook pie pumpkins, I stumbled on this link - Pioneer Woman makes pumpkin puree.  I love the Pioneer Woman.  And I love how easy this is.  At the Farmer's Market, I bought two pie pumpkins (smaller than normal carving pumpkins).  After cutting them in half, scooping out the gunk and cutting them further, I roasted them on cookie sheets.

The second time I did this, I noticed that adding a small amount of water to the bottom of the pan helped keep the pumpkin flesh moist - almost like steaming it in the oven.  If you choose to do this, only add water until it's about half way up the edge of your pan.

After peeling the skin off the flesh of the pumpkin, I cut it into chunks and blended the meat into a thicker consistency.  From my two small pumpkins, I ended up with ten cups of pumpkin puree.  I froze six of the cups and used four in Matt's birthday pumpkin pie (recipe below).  I can't believe how much it made.  I have done this twice now (and have two pumpkins on stand by) and am still astounded by how easy the process is.  If you have any one that is a pumpkin fiend, like my husband, I highly suggest you give this a try!

Matt's Birthday Pumpkin Pie
(originally from Bobby Flay's Pumpkin Pie Throwdown episode on Food Network)

Let me just say that this was delicious!  I doubled the recipe and made three pies.  Also, I used a regular frozen pie crust and it was still very tasty.  I am definitely going to make this for our Thanksgiving pumpkin pie.

Follow my blog with Bloglovin

Thursday, September 12, 2013

Canning (my time as a squirrel)

As it has been getting closer to Fall, I feel a little like a squirrel, needing to bottle up as much of this fresh produce as possible before it runs out.  Last year, I canned bread and butter pickles and apple pie filling and froze spaghetti sauce.  This year, I have been much more ambitious.  I got the hang of it a little last year, but this year I decided to go for it.  And thus, I began canning everything in sight (almost).

The steam canner I use.  As I get more involved in canning, I want to splurge and buy a pressure canner.  A pressure canner allows you to can things that have little to no acidity (like carrots, corn and green beans).  Ideally this would be the same time that I am able to plant a big garden and thus able to can my own vegetables.


I made four quarts of bread and butter pickles (pictured) and canned five pints of garlic jalapeno pickles.

We picked 13 pounds of raspberries!  Of that, we froze four cookie sheets = one very full gallon ziploc bag.  I also made and canned 3.5 pints of low sugar raspberry jam.

When we got back from Disney, I knew I was running out of summer and flew into canning mode.  My Grandma brought us a peck of peaches and since we are not huge fans, I canned three pints of peaches in water so we could consume them slowly.  Also, I knew I wanted to make at least one batch of applesauce, so I bought a half bushel of Paula Red apples (25 pounds) from a local market.

I ended up using around 13 pounds for applesauce (the rest made two delicious pies).  After peeling, coring and slicing them, I threw as many as I could into both of my crockpots with some lemon juice and cinnamon and let them boil over high heat for about four hours.  That gave me enough time to get the kids in bed and prep my canning station.  

I actually was able to can 4.5 quarts of applesauce and 3 pints of peaches within an hour and a half.  Once everything was ready (jars warmed in the dishwasher, lids warmed on a pot of water on the stove and steam canner boiling), I was able to move through it all fairly fast and efficiently. 

My biggest goal for this canning year was to tackle tomatoes.  Tomatoes aren't really that hard to do, but it takes a lot of tomatoes to fill a quart (between 7 and 8 Roma's).  And you have to skin them before you can stuff them into their jars.  If you are just starting out, I wouldn't start with too many or you will get overwhelmed, especially if you have crazy toddlers running around (like I did).  Last year, I did 1/2 a bushel and ended up pureeing the skinned tomatoes and freezing the puree for spaghetti sauce.  If you are planning on canning a bunch of tomatoes, I recommend getting an extra hand to help speed up the process.  

I ended up canning a full bushel (50 pounds) of tomatoes and got 14 quarts of halved tomatoes and 5 quarts of diced tomatoes out of it.  It took about 4 hours of actual flash boiling, skinning, cutting and coring, stuffing and processing time.  That was with my sister helping me.  If it had been me by myself, it would have taken drastically longer.

My tips:

-Keep extra pints and quarts around just in case your produce makes more than the recipe suggests.  For example with my tomatoes, I was only supposed to get 14 quarts out of my 50 pounds, but because the tomatoes were bigger, I ended up getting a full five extra quarts.  If I didn't have the extra cans around, I would have stopped and saved the extra tomatoes for when I bought more cans.  It's not really a big deal, but it can be a time saver to have extra cans around.  Also, if you end up with a little extra, it is nice to be able to put it in a smaller can (like a pint sized one) and can that too.  If you don't have a smaller sized can, you can just refrigerate the extra and use it within a week.

-Have all of your tools ready before you even start.  I always put the jars in the dishwasher and start the "dry" cycle before I even start getting the produce ready just to make sure the jars and good and hot.  I get the steam canner boiling and the small pot with the lids boiling before starting the produce.  The recipe I am using is always pulled up on my iPad or phone or the book is out, so I know exactly where to look if I forgot something.

-I highly recommend buying the extra tools to help can - Ball Utensil Set.  It is around $10 and will help you immensely!  The set comes with a Jar Lifter to get the cans in and out of the boiling water in the canner (very important not to touch it with your hands), a Magnetic wand for getting the lids out of the boiling water (without touching it with your hands), a funnel (immensely helpful in getting liquids into your jars without spilling on the sides) and a Headspace and Bubble Remover tool.  I have used all of these every time I have canned anything.

-Read the recipe and the steps and watch a video before you start.  While you can take your time, you do want to have a basic idea of what to do before you start.  The idea is to move fast enough that your jars stay hot and sterilized.  

-Get a friend to help you.  If you haven't done it before and am nervous, ask someone to help you.  It is always fun when you have someone to talk to or to ask questions.  If you are working on a big batch, like tomatoes, it makes the time go by faster and more fun.

-Don't be intimidated.  Canning was a little scary to me at first, but after I did it a couple times I have found a rhythm and now I enjoy it.  I like the idea of having our own stockpile of fruits and veggies that I have canned.  I know everything that is in them and where the produce came from.  I like knowing I won't have to buy them from the store.

Resources:


I also found watching videos of canning on YouTube helped me get a good understanding of the process, how fast you work and how to get everything organized.

Homestead Acres (one of the best series for everything about canning and homesteading)

And I pinned all the recipes and information I used (from online sources) to my Pinterest board:


I hope this helps any one that doesn't can already get started!
It really gets easier the more and more you do, so don't be afraid!  Jump right in!  

Follow my blog with Bloglovin