Thursday, January 30, 2014

Strong is the new skinny


In the summer, when it was warm and easy to get outside and run and exercise, I wrote this post about my struggle with self doubt, unrealistic expectations and balancing mental happiness.  I was doing so well about working out during the summer, despite the heat, and then school started for Gabe.   As the cold weather set in, it got harder for me to be motivated to get outside and run.  That was the only thing I really saw results from, so I thought that's what I really needed to do.  I had been eating really well until the holidays hit and then I hit a brick wall.

What is it about that time of year that makes healthy eating and reasonable portion sizes so difficult?  

Oh yeah, the food.  

Lots of food.  Lots of sweets.  Lots of carby-breadlike food.  Not so good for you food.


At the end of November, I decided I was going to not let myself fall backwards (at least, any more than I already had).  All of the muscle definition I had at the end of the summer was slowly fading away and I could not let my body revert any further.  After searching the internet (Pinterest), I had found a lot of daily workouts but none that really seemed like it would be demanding, that it would promote the change I was looking for.  I wanted something that would give me some results and inspire me to keep going.  So I decided to start a challenge.  There are all kinds of different challenges floating around Pinterest and other social media.  


Arm Challenge
I decided on starting with squats because I have always had strong legs.  This is a part of my body where I really needed to see results, needed to be inspired, needed to feel like I wasn't just fat.  So I enlisted the help of some of my friends (I highly recommend a support system) so we could push each other and hold each other accountable.  And I started.


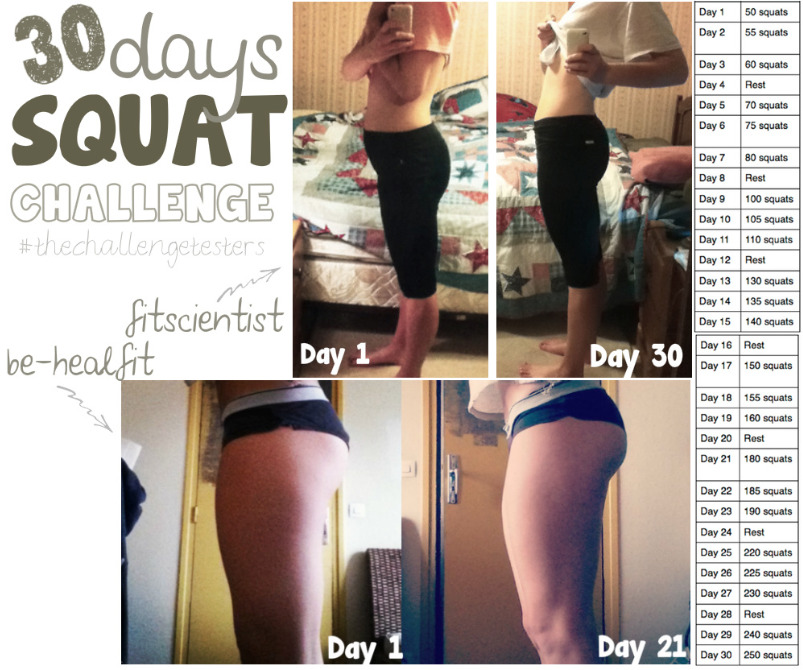
I started and ended up loving it.  I loved that it was 30 days and I didn't get bored.  I loved that it was three days in a row and then a rest day.  I loved that it didn't take a lot of time out of my day.  I loved that by the end of the 30 days, I was doing squats with 15 and 10 pound additional weight.  I loved that I was getting muscles in my legs that I hadn't seen before, even through running.  I loved that I was using my own body weight to get stronger.


I decided this 30 day workout was the way for me.  So I searched and searched for my next challenge to start at the beginning of the year.

My criteria - 

I needed a workout that was hard for me, to make me work for the results.  
I needed something that didn't take that long during the day.
I needed something that would give me results so I would continue wanting to work out.
I needed something that was full body - not just one part of my body for 30 days
I needed something that I could do at home.
I needed something that didn't require a lot of equipment or equipment that was too expensive.

What I found was this: 
Operation Zombie Fit Challenge
And it rocks!

I modified it based on my criteria and found that if I skipped all the cardio days (I am horrible at cardio), then I could implement the other challenge "3 workouts and 1 rest day" schedule.  So that's what I did.  

I have "liked" pages on Facebook (Spot Me, Girl Eat Clean Train Mean Live GreenBusy Mom Gets FitAwkward Gym Moments and My Coach Natalie)  and there I see pictures of women that are fit, muscular and beautiful.  There are pictures of amazing transformations.  And it is from weight training - something I hadn't really thought of before I started the Operation Zombie Fit Challenge.

I just finished yesterday and I am definitely impressed with myself.  

I can curl 15 pound free weights for 15 reps and 5 sets (75 times total).
I can squat and shoulder press 30 pounds for 15 reps and 5 sets.
I can ball pass a weighted stability ball from my hands to my feet and back 15 reps and 2 sets.
I can do abs for about an hour, want to die and move on to the next workout the next day.
I can do all these things I never thought possible, add weights and keep going.


I am completely hooked.

And I am learning a lot as I am going.  I am learning exactly what kind of work out my body needs to get the results I want.  I am learning how far I can push myself and then turn around and push harder the next day.  I am learning I am indestructible.  That I am capable of anything.


And I have never really had that feeling, definitely not about working out, about myself before.

I am learning that my body will never be the skinny super model body with the thigh gap because my body isn't built that way.  I have wide hips, I have big thighs, I have wide shoulders, I have extra skin from being pregnant.  As hard as I work at cardio and running and dieting, I probably will never get as small as I thought I wanted to be.

So I am learning to redefine beauty.


And I am inspired to embrace the body shape I have and make the best out of me.


My next challenge isn't really a challenge so much as a 12 week program.  I am excited because I think it will really test me.  It will challenge me and open my eyes to a new way of living.  

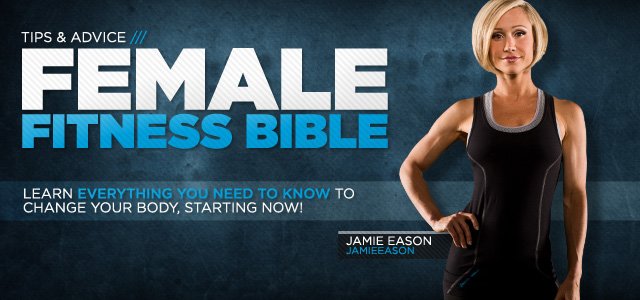
Female Fitness Bible - Bodybuilding.com
I love everything about this article.  It has a work out plan for just lifting and one for adding in cardio for maximum weight loss.  It has a supplement guide to make sure you are getting enough protein and where to get it from.  It has a detailed step by step instruction guide for each move in the work out.  It has tips and advice for trouble areas on the body.  I am anxious to start this on Monday and to start seeing the results of my hard work.

PS - I am addicted to motivational memes, in case you didn't notice.

Check out my Back in Shape pinterest board for more meme's and work out ideas:

Follow Genna Brong's board Back in Shape on Pinterest.
Follow my blog with Bloglovin

Monday, January 20, 2014

Homemade Granola in bulk

I hate boxed cereal. Hate it. And I don't use that word lightly. I hate all the additives. I hate the price. I hate that my kids are totally addicted to it.  I hate the convenience of buying it off the shelf. I hate that we go through a box in a couple days.

Sunday, I decided I would try something new.  I like making big batches muffins for breakfast options on school days. I like making big batches of pancakes that Gabe can microwave one or two in the mornings.  And now, I have made a big batch of granola for a cereal replacement.

I like that I already had all the ingredients at my house and that the quantities are all so big that the kids could help me pour and mix. We actually made it in a brown paper bag so the kids could shake it together. What I really love about granola is how customizable it is. The original recipe (from The Homemade Pantry by: Alana Chernila - best family style cookbook ever) called for sesame sticks (replaced with peanuts), flaked coconut (used raisins) and almond extract (omitted) but ours is still delicious!

Even if you only make a half batch, you will still have a good amount. So try it and see what you think!

Homemade Granola (makes 16 cups)

10 cups (2 pounds) old-fashioned oats
3/4 cup peanuts (or other tree nut)
1/2 cup sunflower seeds
2 cups sliced or chopped raw almonds
1 cup raisins
1/2 tsp. salt
1 1/2 tbsp. cinnamon
3/4 cup canola oil (or whatever oil you want to use)
1/2 cup maple syrup
1/2 cup honey
1 1/2 tbsp vanilla extract

Preheat oven to 200 degrees.

Combine the oats, peanuts, sunflower seeds, almonds, raisins, salt and cinnamon in your largest bowl or we threw everything in a brown paper bag and shook everything until it was mixed.  In a separate bowl, mix together the liquid ingredients until they are a uniform consistency.  Pour the liquid over the dry mixture and stir together until evenly coated.

Line four cookie sheets with parchment paper.  Spread the granola evenly on each pan.  Put them in the oven and set your timer for 20 minutes.  After each 20 minutes, stir the granola around on each pan to ensure it doesn't burn, and reset the timer for another 20 minutes.  Do this once more before the granola is done.  You end up baking the granola for a total of 60 minutes.

Take it out of the oven and let it cool completely before you put it in a bag or plastic container.  It is good in a ziploc or sealed container for 3 weeks and can be frozen for up to 6 months.

Mmmm good!

Thursday, January 16, 2014

My New Years quasi-resolution

My new year didn't exactly begin as I hoped. It started with a yelling match between Gabe and I. A power struggle over the Freetime setting on his Kindle.

Why couldn't I just let him play the apps for an unlimited amount of time?  Why did I make reading for 15 minutes mandatory before the apps were unlocked?  Why did I put limits on his electronics use?  It wasn't fair. It wasn't nice.

And then the age old statement said by every youngster - I wish I was big so I could do whatever I want. 

I hurt hearing all his frustration with me.  Knowing that I was causing all this heartache by standing in his way, in the way of his happiness, made me feel like the worst kind of monster.  But I stood my ground.  

I tried to explain to him that I am being the best parent I can by putting limits on his electronic use, by making him "unplug" and rejoin society. That as his parent, my job is to make him the best he can be and playing an unlimited amount of time on an electronic device is not helping him to learn in all aspects of life. 

It didn't matter what I said. Everything came back to, "I just want to be grown up already."  

And that hurt me the worst. 

I am probably the only person who on New Year's Eve was hoping for a miracle and it would just stay 2013. 

2014 is bringing a lot of change, and while 2013 also brought some adjustments, I am not quite ready for another emotional and physical shake up. 

This year I turn 30 years old. I have been dreading it since before I turned 29.  30 means you have your life figured out. 30 means you are getting old. I am not ready to be 30. I am not looking forward to this milestone. 

This year my first baby turns 8 years old. And while that is not a milestone in itself, the fact that there are only 10 years left until he graduates high school leaves me speechless. 10 years?  That's all I have left before he is officially an adult?  10 years is like a blink of an eye.


This year my second baby, my child that wakes up every morning, seeks me out and hugs me, turns 4 and will start preschool in the Fall. Preschool?  No more hugs after nap. No more bargaining for food at lunch?  No more stampeding around the house with his guns a blazing?  Wait, what?


I don't even want to talk about my baby baby turning 3 and how she already talks in full sentences.  How she is almost as tall as Zander and just as fiercely independent.  How she puts on her own boots and hat, grabs her purse and her Chapstick and tells me she's leaving and good bye while I am left standing there knowing that the real life leaving part is soon a reality.


Please Time, couldn't you just slow down?  For me?  Just a little?

Since I am, if nothing else, a realist and know in my head that all this growing is necessary (Boo!  Hiss!), my resolution to enjoy what time I do have with them. I realize how morbid this sounds, and I don't mean it to (honestly), but with each year passing faster and faster, I am fully understanding now how important it is to spend that quality time together.

So.  With that being said, you might not see me on here very often. The problem with this blog is the actual sitting down and typing out the posts. If I could just have a direct line from my brain to this, then it would be fine. 

But as for now, I will be building more puzzles, making volcanos with baking soda and vinegar, helping my helpers make muffins and granola, putting together a pinewood derby car, and mostly, I will be living with my soon-to-be-grown-up children. 

And enjoying every single second, including the fights.


Sidenote: We are discovering how many awesome classic movies Amazon Prime has and I am so excited that they are starting to enjoy musicals!  Chitty Chitty Bang Bang is our go-to family movie and it completely rocks their world.

Monday, January 13, 2014

Christmas recap and our favorite gifts


Wow.  I hadn't realized it has been about a month since I blogged last.

Time flies and all that.

Here in the Brong household, we had a great Christmas.

The kids got more than they could ever want.

Gabe cried he was so happy he got a Kindle.

Zander and Calla hosted a pirate concert.

They played with cousins.

Calla dressed up.

They hung out with Grandparents.

They played outside.
 

They made Christmas treats.

We went to an Ugly Sweater party and Gabe won!

It was a great end to a great year and we were very happy we were able to see all of our family this holiday season!

There are still a lot of gifts that the kids haven't even played with yet, but here is the list of gifts that they have enjoyed the most and I highly recommend if you are looking for a gift in the future:

Gabe's Kindle
I love this thing.  I should specifically say how much I LOVE Freetime - the system built into the Kindle that allows me to set daily limits on how much app time, video time and reading time Gabe is allowed.  It allows me to set times he can use his Kindle and if I want him to read before playing.  It offers a database of Kindle books, apps and videos just for kids.  At the monthly cost of $2.99 for one child's profile or $6.99 for a family, I think this is a great investment and has really reinforced my love of Amazon.  I HIGHLY recommend this as a tablet option for kids.

Calla's Disney Princess Castle
Calla got this Fisher Price Disney Princess castle and it is so adorable!  It comes with Cinderella and Snow White and there are multiple different Princess packs you can buy to collect all of them.  There is a dance floor in the back where you put each Princess and she states her name ("My name is Ariel.") and sings a little part of her signature song.  It is so adorable and Calla absolutely loves it.  

Zander's Take A Part Truck

This thing is so cool!  It is a fully functional crane truck and comes with a working electric screwdriver to take apart the truck and put it back together.  It comes with different tips and Zander loves being able to take it apart and try to put it back together.  I love that the parts are big enough that they can't get lost and that he can do it by himself (for the most part).  Calla loves it too and tries to help brother.

Click here to see the description!
Click here for the description!
These books are AWESOME!  The pictures are huge!  The words are good sized and not too difficult for Gabe to read to himself.  They offer a wealth of information and fun facts.  There is a whole series, but the boys received these as gifts and they have been a big hit and the go-to books to look at before bedtime.

Click here to see the description!
I love love LOVE all things Melissa and Doug.  I love the sturdiness of the toys, I love the concepts, there isn't much I don't love except the price.  Amazon and Toys R Us almost always have decent sales on Melissa and Doug things around Christmas time.  I also like using Barnes and Noble coupons to order Melissa and Doug things online, as they always have a good amount in stock and sometimes on sale to before the coupon.  Calla got these to sets, but all the kids have enjoyed playing with them and adding them to the kitchen set they got last year.

Click here for the description!
Jake and the Neverland Pirates is really big for us right now.  After seeing him at Disney, it only reinforced the love of all things Jake.  Zander and Calla got a lot of Jake, but the biggest hit was this dress up toy box that includes a spy glass, sword and gold doubloons.  

I am in the process of working on some more "meaningful" blog posts, but I wanted to include the successful Christmas gifts into a post.  I always have a hard to find things for birthdays and holidays.  These are things that work in our family and I hope it helps give you suggestions!

All of the links on this blog are affiliate.

Thursday, December 19, 2013

Christmas Cookie and Candy gifts (the best kind)

I love making food for gifts.  There is something so awesome in working really hard to make something delicious for another person to enjoy.  Tie in the Christmas season with my love of baking and giving food and you get this amazing cookbook that I bought last year for super cheap.

Click to buy it here!

I can't remember how much I bought it for (around $10) and it has been worth every penny.  I LOVE that it provides recipes for classic cookies (like sugar and peanut butter), and that it also has fancier cookies.  But mostly I love that each recipe is designed to feed a crowd.  I like to make big batches of cookies and with this cookbook I don't have to multiple the recipes, it is already done for me!

I knew that I wanted to send Matt a box of cookies and wanted to have enough left over to share with the neighbors (while leaving us some to each at home) and so I settled on two cookie recipes - the drop sugar cookie recipe and peanut butter kiss cookies.
GF drop sugar cookies
I loved the easiness of the drop sugar cookies compared to the roll out frosting kind.  Those are all well and good, but I usually make gingerbread cookies to roll out and decorate.  This time I was making cookies in a rush, so the drop part worked out much better.  All I changed to make this recipe GF was my Namaste Foods all purpose flour and 1/2 teaspoon xanthan gum per cup of flour.  They turned out super delicious, lighter than a regular sugar cookie but still retain the buttery sugary goodness.

GF Drop Sugar Cookies (recipe originally from The Great Christmas Cookie Swap book)
makes approx. 126 cookies

6 cups GF all purpose flour
3 tsp xanthan gum
3 tsp baking powder
3/4 tsp salt
2 1/2 cups butter (4 1/2 sticks) softened (not melted)
3 cups sugar
3 eggs
9 tbsp milk
6 tbsp vanilla

Preheat oven to 350 degrees.  Whisk flour, xanthan gum, baking powder and salt until blended and set aside.  In a large mixing bowl, beat butter and sugar until creamy.  Add eggs, milk and vanilla; beat until well blended.  Add in flour mixture until just blended.

Measure out dough in tablespoons and drop them on the greased cookie sheet about 2 inches apart.  I actually ended up rolling them into balls in my hands and pressed them flat on the sheet.  They don't spread as much as I though, so you don't have to worry about them getting too close together and making one giant misshapen cookie.  I sprinkled colored sugar on them and put them in the oven to bake for 14 minutes.  Remove them when they turn golden brown and set them aside to cool.

I was surprised that the dough didn't soften up too much with all the butter, so you shouldn't have to refrigerate them before baking.


GF Peanut Butter Kiss cookies
I LOVE peanut butter.  A little too much.  Not everyone loves it just plain and simple like me, so I decided to make the peanut butter kiss (get it, a chocolate Hershey's kiss) cookies.  Again, to alter this recipe and make it GF I changed out the flours and added 1/2 tsp of xanthan gum to it.

GF Peanut Butter Kiss cookies (original recipe from my step-mom)
I doubled this recipe and made about 40 cookies

1 1/4 cup GF
1 tsp xanthan gum
1/2 tsp baking powder
3/4 tsp baking soda
1/4 tsp salt
1/2 cup shortening (I used butter)
1/2 cup peanut butter (creamy works best, even though I prefer crunchy)
1/2 cup white sugar
1/2 cup brown sugar
1 egg
1 bag Hershey kisses

Preheat your oven to 375 degrees.  Whisk together the flour, xanthan gum, baking soda and powder and salt to make the dry mixture and set aside.  Cream together your butter/shortening with sugars.  Add in the egg and peanut butter until blended.  Slowly blend the dry mixture into the wet until fully incorporated.  

Refrigerate for 20 minutes to regain firmness of dough.

(I forgot this step originally and they turned out fine - the cookies just spread a little more because of the temperature of the butter.  If you forget or are on a time crunch, no worries.  Go ahead and make the cookies.)

Get out a plate or bowl and pour some white sugar or decorative sugar to roll the cookies in.  Also start unwrapping the kisses so you are ready to press them in the middle of the cookie when you pull them out of the oven.

Measure out one tablespoon of dough and roll it into a ball between your hands.  Roll the dough in the sugar until it is completely covered.  Fill up your pan and bake for 10-12 minutes.  Once the cookies are browned, remove them from the pan and press the Hershey's kiss in the middle of the cookie and let it cool.


I found these cute decorative ziploc bags in the Dollar Spot at Target and they came with cardboard to staple over the zipper part (dresses it up a little).  I included a couple of each kind on a small plate my Grandma had given me (to start a cookie exchange) and put them all in a larger ziploc bag.  We made four of these and enjoyed passing them out to our neighbors!

I didn't forget about Matt and set aside about two dozen of the sugar cookies and a dozen and a half of the peanut butter kisses for him.  I wanted to add more to fill his box up as much as possible.  Also, I am always nervous about sending something as perishable as cookies, especially now with the chaotic process that is the US postal system during Christmas.  I had a couple 'pins' set aside that I wanted to try out, so I decided Matt would be my guinea pig (love you babe).  

Cinnamon Sugar Nuts
I originally saw this post from Eat Good 4 Life (Cinnamon Sugared Walnuts) and decided to go for it.  I have never really candied anything but I have burned sugar trying to make caramel a couple times, so I was a little hesitant.  I had almonds, walnuts and cashews on hand and measured out two pounds to make a double batch.

Over all the recipe was very easy.  I was extremely nervous about burning the sugar while trying to bring it up to the soft ball temperature (235 degrees) so I had it on lower heat than I probably should have.  Also, my candy thermometer's battery died (awesome timing) so I used my meat thermometer and it worked just fine.  It did eventually reach that temperature and I added the vanilla and nuts as soon as it did.  I couldn't get the mixture to spread out enough for me to break into individual nuts (like she has pictured), so mine is in chunks kind of like brittle.

Let me just tell you that it is amazing.  It reminds me a lot of the booths at malls and amusement parks that sell the candied almonds in the pastry bags.  I will definitely make it again and I am excited about giving it as gifts or bringing it as a dessert to pass.  

I also got these little boxes at Target's Dollar Spot.  I can't handle the cuteness!

Lastly, I made chocolate covered pretzels to add in there.  I have a surplus of pretzels and chocolate chips, so I figured why not.


I will not even try to say that these works of art are mine - I forgot to take a picture.  If you are looking at making something fast and easy, these are the way to go!  I hand dipped half of each pretzel into milk chocolate and then dipped the chocolate part into sprinkles to set the chocolate.  I love how versatile they can be.  You can use any shape of pretzel, any kind of chocolate and any extra topping you want.  

Dark chocolate covered pretzels in candy cane chunks.
Milk chocolate covered pretzels with sea salt.
Semi sweet chocolate covered pretzels with nuts.

I love the possibilities.  I love that it seems fancy and in all reality - it's just a pretzel.

Kind of like these gifts.  

They are just cookies and candies, but they are dressed up as gifts of goodwill and community.  

If you are looking for more Holiday candy ideas, as well as ideas for how to dress up packaging them, check out my Pinterest page!