Showing posts with label DIY Projects. Show all posts

Thursday, December 19, 2013

Christmas Cookie and Candy gifts (the best kind)

I love making food for gifts.  There is something so awesome in working really hard to make something delicious for another person to enjoy.  Tie in the Christmas season with my love of baking and giving food and you get this amazing cookbook that I bought last year for super cheap.

Click to buy it here!

I can't remember how much I bought it for (around $10) and it has been worth every penny.  I LOVE that it provides recipes for classic cookies (like sugar and peanut butter), and that it also has fancier cookies.  But mostly I love that each recipe is designed to feed a crowd.  I like to make big batches of cookies and with this cookbook I don't have to multiple the recipes, it is already done for me!

I knew that I wanted to send Matt a box of cookies and wanted to have enough left over to share with the neighbors (while leaving us some to each at home) and so I settled on two cookie recipes - the drop sugar cookie recipe and peanut butter kiss cookies.
GF drop sugar cookies
I loved the easiness of the drop sugar cookies compared to the roll out frosting kind.  Those are all well and good, but I usually make gingerbread cookies to roll out and decorate.  This time I was making cookies in a rush, so the drop part worked out much better.  All I changed to make this recipe GF was my Namaste Foods all purpose flour and 1/2 teaspoon xanthan gum per cup of flour.  They turned out super delicious, lighter than a regular sugar cookie but still retain the buttery sugary goodness.

GF Drop Sugar Cookies (recipe originally from The Great Christmas Cookie Swap book)
makes approx. 126 cookies

6 cups GF all purpose flour
3 tsp xanthan gum
3 tsp baking powder
3/4 tsp salt
2 1/2 cups butter (4 1/2 sticks) softened (not melted)
3 cups sugar
3 eggs
9 tbsp milk
6 tbsp vanilla

Preheat oven to 350 degrees.  Whisk flour, xanthan gum, baking powder and salt until blended and set aside.  In a large mixing bowl, beat butter and sugar until creamy.  Add eggs, milk and vanilla; beat until well blended.  Add in flour mixture until just blended.

Measure out dough in tablespoons and drop them on the greased cookie sheet about 2 inches apart.  I actually ended up rolling them into balls in my hands and pressed them flat on the sheet.  They don't spread as much as I though, so you don't have to worry about them getting too close together and making one giant misshapen cookie.  I sprinkled colored sugar on them and put them in the oven to bake for 14 minutes.  Remove them when they turn golden brown and set them aside to cool.

I was surprised that the dough didn't soften up too much with all the butter, so you shouldn't have to refrigerate them before baking.


GF Peanut Butter Kiss cookies
I LOVE peanut butter.  A little too much.  Not everyone loves it just plain and simple like me, so I decided to make the peanut butter kiss (get it, a chocolate Hershey's kiss) cookies.  Again, to alter this recipe and make it GF I changed out the flours and added 1/2 tsp of xanthan gum to it.

GF Peanut Butter Kiss cookies (original recipe from my step-mom)
I doubled this recipe and made about 40 cookies

1 1/4 cup GF
1 tsp xanthan gum
1/2 tsp baking powder
3/4 tsp baking soda
1/4 tsp salt
1/2 cup shortening (I used butter)
1/2 cup peanut butter (creamy works best, even though I prefer crunchy)
1/2 cup white sugar
1/2 cup brown sugar
1 egg
1 bag Hershey kisses

Preheat your oven to 375 degrees.  Whisk together the flour, xanthan gum, baking soda and powder and salt to make the dry mixture and set aside.  Cream together your butter/shortening with sugars.  Add in the egg and peanut butter until blended.  Slowly blend the dry mixture into the wet until fully incorporated.  

Refrigerate for 20 minutes to regain firmness of dough.

(I forgot this step originally and they turned out fine - the cookies just spread a little more because of the temperature of the butter.  If you forget or are on a time crunch, no worries.  Go ahead and make the cookies.)

Get out a plate or bowl and pour some white sugar or decorative sugar to roll the cookies in.  Also start unwrapping the kisses so you are ready to press them in the middle of the cookie when you pull them out of the oven.

Measure out one tablespoon of dough and roll it into a ball between your hands.  Roll the dough in the sugar until it is completely covered.  Fill up your pan and bake for 10-12 minutes.  Once the cookies are browned, remove them from the pan and press the Hershey's kiss in the middle of the cookie and let it cool.


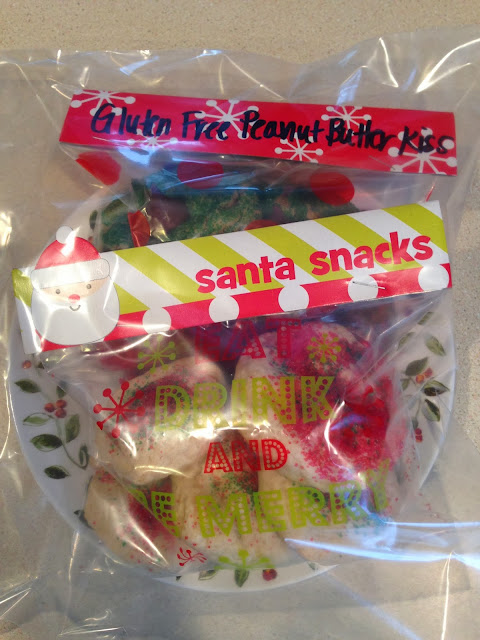
I found these cute decorative ziploc bags in the Dollar Spot at Target and they came with cardboard to staple over the zipper part (dresses it up a little).  I included a couple of each kind on a small plate my Grandma had given me (to start a cookie exchange) and put them all in a larger ziploc bag.  We made four of these and enjoyed passing them out to our neighbors!

I didn't forget about Matt and set aside about two dozen of the sugar cookies and a dozen and a half of the peanut butter kisses for him.  I wanted to add more to fill his box up as much as possible.  Also, I am always nervous about sending something as perishable as cookies, especially now with the chaotic process that is the US postal system during Christmas.  I had a couple 'pins' set aside that I wanted to try out, so I decided Matt would be my guinea pig (love you babe).  

Cinnamon Sugar Nuts
I originally saw this post from Eat Good 4 Life (Cinnamon Sugared Walnuts) and decided to go for it.  I have never really candied anything but I have burned sugar trying to make caramel a couple times, so I was a little hesitant.  I had almonds, walnuts and cashews on hand and measured out two pounds to make a double batch.

Over all the recipe was very easy.  I was extremely nervous about burning the sugar while trying to bring it up to the soft ball temperature (235 degrees) so I had it on lower heat than I probably should have.  Also, my candy thermometer's battery died (awesome timing) so I used my meat thermometer and it worked just fine.  It did eventually reach that temperature and I added the vanilla and nuts as soon as it did.  I couldn't get the mixture to spread out enough for me to break into individual nuts (like she has pictured), so mine is in chunks kind of like brittle.

Let me just tell you that it is amazing.  It reminds me a lot of the booths at malls and amusement parks that sell the candied almonds in the pastry bags.  I will definitely make it again and I am excited about giving it as gifts or bringing it as a dessert to pass.  

I also got these little boxes at Target's Dollar Spot.  I can't handle the cuteness!

Lastly, I made chocolate covered pretzels to add in there.  I have a surplus of pretzels and chocolate chips, so I figured why not.


I will not even try to say that these works of art are mine - I forgot to take a picture.  If you are looking at making something fast and easy, these are the way to go!  I hand dipped half of each pretzel into milk chocolate and then dipped the chocolate part into sprinkles to set the chocolate.  I love how versatile they can be.  You can use any shape of pretzel, any kind of chocolate and any extra topping you want.  

Dark chocolate covered pretzels in candy cane chunks.
Milk chocolate covered pretzels with sea salt.
Semi sweet chocolate covered pretzels with nuts.

I love the possibilities.  I love that it seems fancy and in all reality - it's just a pretzel.

Kind of like these gifts.  

They are just cookies and candies, but they are dressed up as gifts of goodwill and community.  

If you are looking for more Holiday candy ideas, as well as ideas for how to dress up packaging them, check out my Pinterest page!  


Wednesday, December 18, 2013

DIY Christmas gifts (reposted from a couple years ago)

If you need some ideas for DIY gifts this Christmas, here is a list of things I made in previous years.  I wanted to repost this because I still really love all these ideas and think they will make excellent gifts.  They also pass the cheap and super easy requirement I have for all DIY's.

I have been making a bunch of gifts this year and hope the post pictures and guides within the next couple days!

--------------------------------------------------------------------------------------------------------

This year, we decided to make it a DIY Christmas.  With all the ideas on websites like Pinterest to get the creative juices flowing, I think we've done really well.  I'm really excited to be creating.  This is one of my "things".  

Baby food jar candle holders -


I put stickers on the baby food jar and acrylic painted over them.  Before the paint completely dries, pull off the letters.  Once it's dry, trace the outline of the letters with a paint marker (my new favorite craft item).  After that, I mod podged the whole jar for the glossy look.

Hand and foot print canvas -


I bought an 8x10 canvas at Hobby Lobby, spray painted it matte black and had the kids pick out what acrylic paint for their prints.  Then I wrote the title and names with a silver paint marker and mod podged it.

Homemade ornaments - 


The reindeer is two clothespins hot glued together with goggly eyes and a pom pom nose.  I also hot glued a magnet to the back for a refrigerator decoration.  The Star Wars ornaments are made out of salt dough (equal parts salt and flour, half part water), the kids colored them with Crayola markers and I sealed them with mod podge.

Picture Magnets -


By far the most time consuming project I took on, but I think that's because I made so many and because I made them so big.  I had 5 different sets of wallets printed, then cut out cardboard in wallet size.  After double-side taping the picture to the cardboard, I wrapped the picture with clear packing tape and hot glued two magnets to the back of the cardboard.  If I had to do it again, I would have used smaller pictures, only because I had to use two pieces of packing tape (due to the size) and it left a seam on the pictures.

Teacher card -


Completely and utterly stolen from Pinterest, but redesigned on Photoshop.  A Starbucks gift card will be tucked inside the coffee liner.

Scrapbook paper picture frames -


I bought wooden frames from Hobby Lobby and spray painted them matte black.  Then I had the kids rip up pieces of scrapbook paper.  After piecing them together and adding a few extra rips and tears, I double-side taped them to the frame and applied mod podge to seal it and add gloss.

Holiday picture frame -


This was actually the first project I did this year.  Again, I started with a blank wooden frame from Hobby Lobby and spray painted it with glossy green (I will never use glossy spray paint again, too much of a pain).  Then I painted the snow flakes with white acrylic paint and a stencil.  After everything dried, I added the mod podge.

I really do love being creative.  It's so fulfilling to see your finished products.  If you haven't check out Pinterest yet, you really should.

Sunday, December 15, 2013

Fleece Poncho DIY

I am completely done with my Christmas shopping!  I was actually done with the majority about a week ago (finishing up right after Thanksgiving), but have now completely finished with the exceptions of homemade gifts.  

I will repost my DIY present list from a couple years ago soon - but I have gotten a little creative this year too and found this super cute tutorial for making a fleece poncho for little girls for super cheap.


What I liked about this idea is you don't have to do a whole lot to make it and it's cheap.  If you have ever made a no sew fleece blanket, this is even easier.

I went to Hobby Lobby and bought one yard of fleece fabric - got it on sale (30% off) and paid $8 for it.  

I started as soon as I got home so I wouldn't get distracted and measured out a 27 inch square and cut.  Then I folded it in half and if there was extra hang off on either side, I cut it off.  Just like in the tutorial, I used a bowl to cut a half circle for the head and then cut about an inch up along all the edges.


I just estimated about the same size cuts and the same width of each fringe and cut.


And that was it.  Picked it up and put it on Calla to see if it would fit.


I found that the 27 inch square of fleece fit Calla perfectly - so that would work perfectly for a little girl in a size 2T.


Since the one yard of fleece makes two ponchos (and leftover scraps), I decided to make another one for my niece.  Without having her here to measure or estimate, I tried one on Zander (roughly her size).  He was a very enthusiastic model and was sad when he found out he wasn't getting one.


I found that for each size up, you add about three inches to your square.

So for a 3T size, cut out a square about 30 inches.  For 4T, cut out a square about 33 inches.  And it worked out!

My lovely Lella wearing her "cape".

All in all - I made two fleece ponchos for two very special girls at $4 a piece.  If you are struggling at an idea for a gift or don't have a ton of money to splurge on a present - this is an awesome idea and can't get much easier to make.  It took me about 20 minutes to make both and that was only because I unfolded the ponchos to try them on my models.

If you have a child that wants a cape (like mine), there are also some awesome cape ideas that are just as cost efficient and easy to make:
DIY Superhero Cape Tutorial - by the Southern Institute
Superhero Cape Towels - by Martha Stewart
Superhero Cape Logo pattern - by Vanilla Joy

Follow my blog with Bloglovin

Tuesday, December 10, 2013

Christmas Advent Calendar

With Thanksgiving being at the very end of November this year, it really threw me for a loop when we had to start decorating for Christmas while still eating Thanksgiving left overs.  I usually like to have Thanksgiving stand as a holiday by itself so I was in a scramble to get our decorations changed.  If it wasn't for our Advent calendar and celebrating every day until the 25th, then I wouldn't have been in such a rush.  This is a tradition we do every year and I know every one really enjoys it.

In years prior, we filled each day with one piece of candy to count down the days until Christmas.  It always brought excitement because candy is pretty limited in this house, so to get a piece (a Hershey's kiss or Tootsie roll ) everyday was cause for celebration.

This year, I decided to do something different.  I have seen numerous ideas and suggestions online for doing activities instead of getting candy.  On every day before Christmas, you do something special to celebrate the season.

I love this idea.

Even though Matt and I grew up in religious households, we haven't quite found our "calling" (bear with me) to start attending church, to tell our children the stories we learned growing up or to teach them about the real reason Christians celebrate Christmas.  This year is a little different.

Gabe has started getting more curious, wanting to know more and more about religion.  At his school, there is the option to go to Bible Club and miss a recess.  A lot of his friends go to Bible Club and bring their bibles to school.  Gabe doesn't really know what to make of this.  They tell him about the birth of Jesus and other stories from the Bible.  He has asked for a Bible for Christmas so he can read it and learn more about what his friends are telling him.

I am glad he is taking interest in this.  I want him to believe in something bigger than this world, that there is a larger plan in place and that we need to put others before ourselves.  Matt and I decided when we first talked about raising our kids that we would let them decide for themselves, if they chose to get baptized and accept Jesus as their Savior then that would be their choice and it wouldn't be forced on them.

With that in mind this holiday season, I decided to research different advent calendar activities to do every day before the 25th.  There are A LOT out there.  I have included my Pinterest board at the bottom full of great ideas!  After making my list, I realized I couldn't make all of them donations or with giving in mind, I just don't have time to be running donations all over town or bringing kids to and from different events every day.  The best part of this is idea is that you can make it whatever you want.  For our family, I combined some donation ideas, outside activities, art projects and "field trips."

Here is our list!

Catch snow in a bucket


Water color the snow


Paint snowflakes on the windows


Cut out snowflakes


Make paper stockings


Family board game Night


Make a Santa Beard in a bubble bath


Snowman Soup


Polar Express Story time


Write letters to Santa


Make Cookies for the Neighbors


Watch a Christmas movie with 


Sprinkly Popcorn


Take a Picture with Santa Claus


Read the Story of Jesus


Read the Night before Christmas


Make Popsicle Stick snowflakes


Have cookie cutter pizzas for dinner


Sort through toys to donate


Make Christmas cards for relatives


Drive around to see Christmas lights


Decorate paper bags for the 

Children’s Food Bank


Go to a Hockey game!


Glue cotton balls on Santa’s Beard


Blow bubbles in the snow


I printed these out and put arranged them inside our Advent calendar in the order of events I already had planned or based on traditions (like reading The Night Before Christmas on the 24th).  Some of these we have done before but I included a lot of new ideas and the kids have really enjoyed every day.

Cutting snowflakes out of coffee filters:

Catching snow in a bucket (or on your tongue):


Sort through toys to donate:

Take a picture with Santa Claus:

Make a Santa beard in a bubble bath:

Every day brings something different and it has been a lot of fun doing this activities and well as planning them!  What do you and your family do to celebrate the season?


Don't forget to pin this and save my ideas for your Christmas Advent activities!

Monday, November 11, 2013

Sun Catcher Turkeys


This past week has been insanity, but much more than usual.  We are getting our windows replaced.  All the windows in the house.  What was supposed to take two days to complete is taking seven.  So the house is pretty ripped apart.  And we have been spending more than the average time away from the home in order to keep warm.  Since they have had to take out all the windows.  In the whole house.  In 30 degree weather.  Great timing!


In trying to keep the kids busy and out of trouble, I quickly thought of a fun art project to do that combined a couple ideas I had seen on Pinterest.  It was really entertaining for the kids and we had all the supplies on hand.

Behold the our sun catcher turkey!


I took coffee filters and cut them in a feather shape (what do you call that shape? Oval with two points?) and got three from each filter. I decided that five feathers per turkey would make his fan pretty full, feel free to do four if the odd feather in the middle bothers you.


From there, I let the kids water color paint the coffee filter feathers. Dropping water onto the water color paint made it much easier for them to get enough color on their brush for it to stand out against the white filter (I used a medicine syringe and put three or four drops of water per color). I really liked the feathers where the kids had used almost too much water. The coffee filter absorbed it and the colors spread and mixed together.


To make the turkey, I sketched out a bowling pin and cut him out. If you guys decide you want it, I can trace my turkey shape and post him on here or you to use as a template. It really wasn't too hard to get a basic shape.


I let the feathers dry on top of paper towels and glued on the googly eyes and triangle beak while we waited. Once they were dry, we assembled the turkeys and I glued the body's to the feathers and taped up the back for extra support.


And now they have a home on our sliding door. I love how they look in the sun light and how every feather turned out differently. The kids had a great time painting! All in all, it really didn't take a lot of time to throw together and now we have fantastic November art work to show off!
Follow my blog with Bloglovin

Tuesday, November 5, 2013

Thankful trees (revisited)

Written on the 1st of November- 

Last year, I bought these cool cardboard cut out trees from Target for cheap and decided we would hang "Thankfuls" from the trees. It worked a little for last year but then our trees got too full and we didn't have enough room to finish.

This year, I saw that Scholastic Teacher Express was having a 50% off sale on some of their November bulletin board decorations and splurged ($2.50 each) on two giant card stock paper sets.  One is a plain tree with different leaves. The idea is for teachers to write each child's name on a leaf. And the other is specifically themed for Thanksgiving.  It has a pilgrim girl, a turkey and leaves and acorns that all say "I am thankful". 

On our big wall I decided to hang up our tree and use the set of "I am thankful" leaves first. We might end up needing the other set too. I love that you can write on them with dry erase markers and they wipe right off. 

Tonight, I explained a little of the origins of Thanksgiving and how we celebrate it now. How we need to remember to be thankful for all that we have and everyone around us, because we have been blessed to live in abundance.  I explained that children all over Michigan don't have things that they take for granted. 


Gabe decided that he is thankful for our furniture and beds, because some families have to sleep on the floor. Zander said he was thankful for all of our books and Calla was thankful for our crayons.  This is going to be a great investment (of $5) and am looking forward to what the kids think of to be thankful. 


Here are our Thankful Trees from last year and the freebie download so you can cut out and make your own!
Thankful Trees tutorial and Freebies!

Follow my blog with Bloglovin

Wednesday, October 16, 2013

Apple printing

I had plans for today. It involved leaving the house. It involved running errands, getting things mailed, grabbing items we have run out of and returning a pair of pants.

 And then, Zander looked at me and said, "Do we HAVE to go TODAY?? Can't we go another day?" And then it started raining and the temperature dropped to 50 degrees.  And I decided, "No, we don't have to go shopping today.  Want to do art instead?"

Art is HUGE at our house.  It takes precedence over reading, over watching Netflix, over eating, over bath time (although some of those like Netflix and baths are usually related to art time).  I have been trying to include one art project a week.  We do coloring with markers, pencils and crayons often.  We do stickers and stamps often.  By art project, I mean something out of the ordinary, something that requires a little more out of me so that they can do something different.

We have done a lot of painting lately and while I would love to move away from that medium, we ended up painting again today.  Today, we did apple printing.


I have seen lots of ideas about how to do apple printing and have been meaning to do this for awhile but something always seemed to take priority.  I would have LOVED to do a big mural with our roll of paper but Zander and Calla wanted to make individual pictures.  It worked out better this way, as Calla was more of a smear painter than a stamper (like Zander).

I am glad we made time to do this art work today and can't wait to see it hanging on the walls.

(I have started an Amazon affiliate account, so if you buy something from Amazon that I have linked, I get a commision.)

Follow my blog with Bloglovin